How to Wrap a Kid's Scooter A Step-by-Step Guide
Wrapping a kid’s scooter can make it look fresh, personalized, and fun. Whether you are preparing it as a gift or simply want to give the scooter a new look, the process can be enjoyable and rewarding. In this article, we will provide a comprehensive guide on how to wrap a kid's scooter effectively.
Step 1 Gather Your Materials
Before you begin, you will need to gather all the supplies required for the wrapping process. Here is a list of items you will need
- High-quality wrapping paper or vinyl Choose designs that are appealing to kids, such as bright colors, cartoon characters, or patterns. - Scissors You will need a good pair of scissors to cut the wrapping paper. - Tape Clear tape or double-sided tape works best for keeping the paper in place. - Ruler To ensure accurate measurements of the paper pieces. - Pencil For marking measurements on the paper. - Comfortable working space Make sure you have a flat surface where you can work efficiently.
Step 2 Clean the Scooter
Before wrapping, it is essential to clean the scooter thoroughly. Use a damp cloth to wipe down the body, wheels, and handlebars. This removes any dust, dirt, or grease, allowing the wrapping material to adhere better. Once cleaned, let the scooter dry completely.
Step 3 Measure and Cut the Wrapping Material
Using a ruler, measure each section of the scooter that you plan to wrap. This includes the deck, handlebars, and any other parts you wish to cover. Remember to add a little extra to the measurements for overlaps and edges. Mark your cut lines with a pencil, then carefully cut the wrapping material according to these measurements.
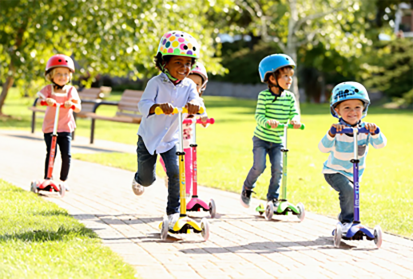
Step 4 Start Wrapping the Deck
how to wrap a kids scooter
Begin with the deck, as this is the largest part of the scooter. Lay the cut piece of wrapping paper or vinyl over the deck. Once it is positioned correctly, start from one end and slowly press the paper down, ensuring that there are no air bubbles trapped beneath. Use tape to secure the edges, folding them under for a neat finish. It’s important to work slowly and carefully to get the best results.
Step 5 Wrap the Handlebars
Next, move on to the handlebars. Measure and cut two strips of wrapping paper for the handlebars. Start at the top of one handle and wrap down to the bottom, keeping the material tight and smooth. Secure it with tape at both ends. Repeat the same process for the other handle.
Step 6 Add Finishing Touches
Now that the main components are wrapped, take a look at the scooter to ensure everything is neat. If there are any wrinkles or bubbles, gently smooth them out. Consider adding additional decorative elements like stickers, glitter, or glow-in-the-dark paint to personalize the scooter even further. These little touches can make the scooter truly unique and special for the child.
Step 7 Protecting the Wrapped Scooter
Finally, it's a good idea to apply a layer of clear sealant or varnish over the wrapped areas to protect them from scratches and wear. This step is particularly beneficial for outdoor use, as it enhances durability. Allow the sealant to dry according to the manufacturer's instructions.
Conclusion
Wrapping a kid's scooter is a fun and creative way to give it a new look while also engaging your child in the process. By following these steps, you can create a customized scooter that reflects the child's personality, making it even more enjoyable to ride. Remember to encourage your child to help with the wrapping, as this can foster creativity and pride in their new ride. Happy wrapping!

-

 Scoot&RideKids Child Kick Push Scooter 3 Wheels with LED Flashing Tilt Lean Boys Girls Scooter
- 4
$33.17 -
 Scoot&RideKids Scooter Child Kick Flashing LED Light Up 3 Wheel Push Adjustable Folding 3
- 0
$25.52 -
 Scoot&RideKids Scooter Child Kick Flashing LED Light Up 3 Wheel Push Adjustable Folding 2
- 0
$33.17 -
 Scoot&RideKids Scooter Teens Foldable Kick Push Scooter Adjustable Height Safe 2 Wheels
- 4
$49.99
Meet our partners and discover what powers their creativity!
When you register for a Lohas scooter, you will receive a 10% discount on your first order and can be notified of sales, new product launches and other offers in advance.